Kalanchoe, a popular succulent, is loved not only for its vibrant blooms but also for its hardiness and ease of care. One of the most rewarding aspects of growing Kalanchoe is the ability to propagate it, particularly through its leaves. This fascinating method allows you to multiply your plant collection using just a single leaf. In this article, we’ll take a deep dive into how to propagate Kalanchoe successfully using one leaf, ensuring that you can cultivate thriving succulents in your home.
Understanding Kalanchoe
Before diving into propagation techniques, let’s briefly cover what Kalanchoe is. Kalanchoe is a genus of succulent plants belonging to the Crassulaceae family. They are native to Madagascar and are known for their ability to store water in their leaves, making them incredibly resilient in dry conditions. There are several species, but Kalanchoe blossfeldiana is the most commonly grown as a houseplant and appreciated for its colorful flowers.
Latest Posts
- Easy Steps to Successfully Grow Bhindi in Grow Bags at Home
- Easy Steps to Grow a Healthy Guava Bonsai at Home for Beginners
- How to Successfully Grow and Cultivate White Strawberry Plants at Home for Delicious and Unique Fruits
- Ultimate Guide to Successfully Growing Weeping Fig Outdoors with Proven Techniques and Expert Tips
- How to Successfully Grow Flemish Beauty Pear Trees in Canada for Optimal Harvest
- Easy Hack to Grow Strawberries Year Round in Your Home Garden for Delicious Harvests
- Growing Flemish Beauty Pears in Canada A Complete Guide for Local Gardens
- The Ultimate Guide to Growing Hibiscus Plants Year Round for Vibrant Blooms and Healthy Foliage
- Easy Ways to Boost the Growth Rate of Your Indoor Peace Lily for Lush Green Foliage
- How to Successfully Grow Oak Leaf Lettuce in Your Home Garden for Fresh and Flavorful Salads
Why Propagate Kalanchoe?
-
Cost-Effective: Propagating Kalanchoe from a single leaf is a budget-friendly way to expand your collection without purchasing new plants.
-
Personalized Garden: It allows you to create unique arrangements and combinations according to your aesthetic preferences.
-
Fun Activity: Gardening offers therapeutic benefits. The propagation process can be a satisfying and educational experience.
-
Plant Health: Healthy plants can be propagated, ensuring that you maintain a vigorous collection.
Steps to Successfully Propagate Kalanchoe Using Just One Leaf
Step 1: Select the Right Leaf

The first step in propagation is choosing the right leaf. The best leaves for propagation will be mature, healthy, and free of signs of disease or pests. Look for leaves that are plump and firm. Avoid leaves that are shriveled or damaged, as they may not root effectively.
Step 2: Prepare the Leaf
Once you have selected your leaf, you need to prepare it for propagation:
-
Cut the Leaf: Use a clean, sharp knife or scissors to gently cut the leaf from the stem. Ensure that you make a clean cut to avoid damaging the plant.
-
Let it Callous: After cutting the leaf, allow it to sit in a warm, dry place for 2–3 days. This process, known as callousing, allows the cut end to dry out and form a protective seal. This is crucial because it helps prevent rot when the leaf is placed in soil.
Step 3: Choose the Right Soil
Kalanchoe thrives in well-draining soil, so it’s important to choose the right medium for propagation. A cactus or succulent potting mix is ideal, but you can also create your own by mixing regular potting soil with perlite or sand to improve drainage.
Step 4: Planting the Leaf
-
Prepare the Pot: Choose a small pot with drainage holes. Fill it with your chosen soil mix, leaving about an inch of space at the top.
-
Plant the Leaf: Once the leaf has calloused, gently insert the cut end into the soil about an inch deep. Make sure the leaf is upright and not laying flat on the soil surface, as this could encourage rot.

Step 5: Watering
Watering is a crucial part of promoting healthy root growth. Follow these guidelines:
-
Initial Watering: After planting, water the soil lightly to moisten it, but avoid soaking it. The goal is to keep the soil slightly damp, not wet.
-
Let it Dry: Allow the soil to dry out completely between waterings. Overwatering is one of the most common mistakes beginners make and can lead to root rot.
Step 6: Provide the Right Environment
Kalanchoe thrives in bright, indirect sunlight. Here’s how to create the perfect environment:
-
Light: Place your potted leaf in a spot that receives bright, indirect sunlight for several hours a day. Direct sunlight can scorch the leaf, hindering its ability to root effectively.
-
Temperature: Kalanchoe prefers temperatures between 65°F and 80°F (18°C to 27°C). Avoid exposing the plant to cold drafts or extreme heat.
Step 7: Monitor Growth

Patience is key when propagating Kalanchoe. It can take several weeks for roots to develop. During this time, keep an eye on the leaf for signs of growth:
-
Roots: You may notice small roots forming at the cut end of the leaf after a few weeks.
-
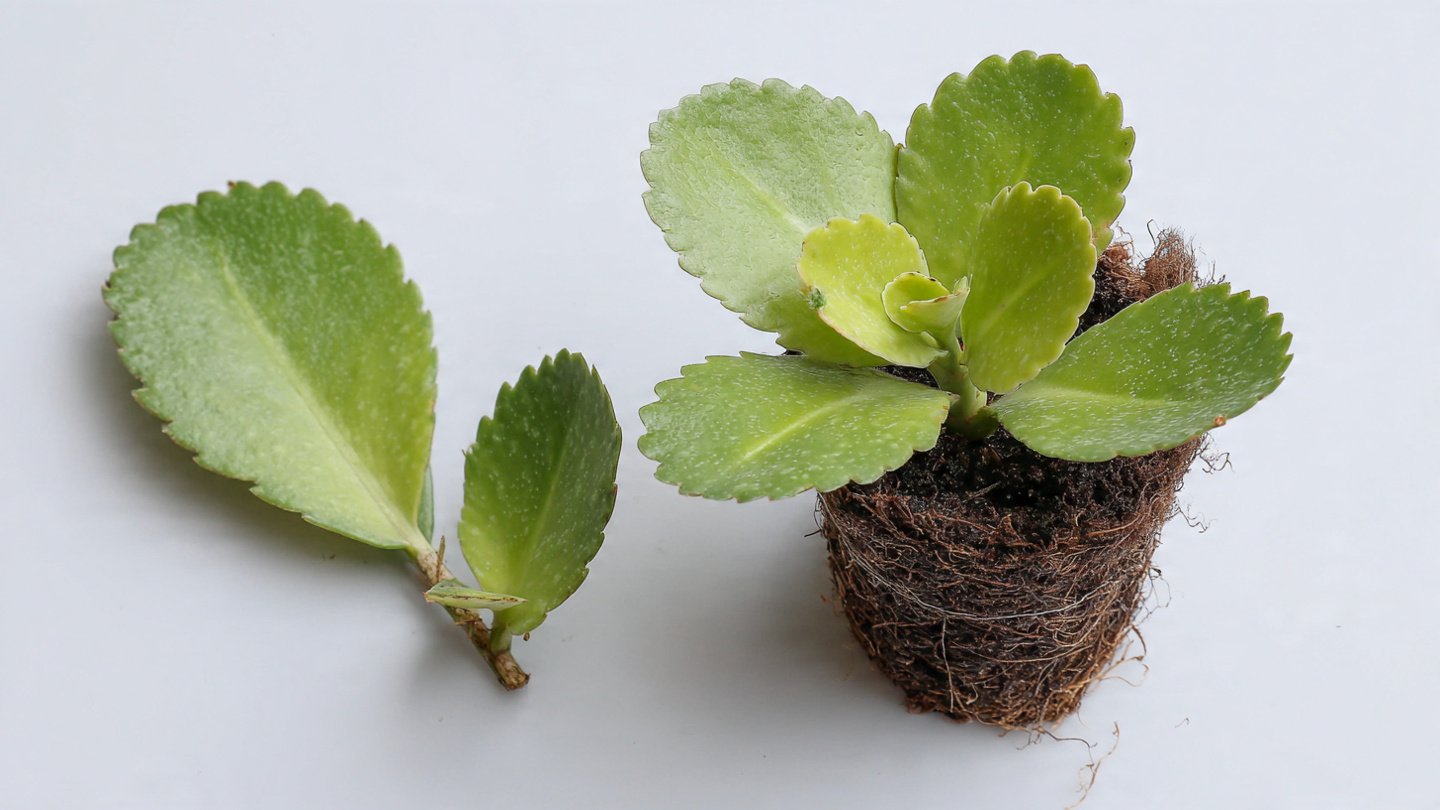
New Growth: Eventually, the leaf may produce tiny plantlets (offsets) along its edges. This is a sign that the propagation was successful.
Step 8: Transplanting
Once the leaf has developed strong roots and new growth, it’s time to transplant your Kalanchoe into a larger pot, if desired:
-
Choose a Pot: Select a pot that is slightly larger than the current one and has drainage holes.
-
Carefully Remove: Gently remove the leaf from its current pot, being cautious not to damage the new roots.
-
Replant: Place the rooted leaf in the new pot filled with well-draining soil. Water lightly and place it back in a bright, indirect light location.
Step 9: Ongoing Care

To ensure your newly propagated Kalanchoe continues to thrive, follow these care tips:
-
Watering: Water less frequently as the plant establishes itself. Let the soil dry out between waterings.
-
Fertilization: After a month, consider using a diluted, balanced fertilizer once a month during the growing season (spring and summer).
-
Pruning: Prune any dead or yellowing leaves to promote healthy growth.
FAQs
1. How long does it take to propagate Kalanchoe from a leaf?
Propagation can take anywhere from 2 to 6 weeks, depending on environmental conditions and the type of Kalanchoe. Patience is essential while waiting for roots to develop.
2. Can I propagate Kalanchoe in water?
While some succulents can be propagated in water, Kalanchoe prefers to be propagated in soil. The chances of rot increase in water, so it’s best to stick to the soil method.
3. What should I do if the leaf rots?
If you notice that the leaf is rotting, it’s essential to remove it immediately to prevent any fungal spread to other plants. Start the propagation process again with a new, healthy leaf.

4. Can I propagate Kalanchoe in different seasons?
Yes, Kalanchoe can be propagated at any time, but spring and early summer are generally the best times for successful growth, as the plant is entering its active growing phase.
5. How many leaves can I propagate at once?
You can propagate several leaves at once, but be sure to provide enough space and avoid overcrowding in the pot to ensure that each leaf has adequate room to grow.
6. Do I need to fertilize the leaf after propagation?
It’s best to wait a month before applying fertilizer after the leaf has taken root. Initially, focus on root development.
Conclusion
Successfully propagating Kalanchoe using just one leaf is a straightforward process that can yield beautiful new plants. By selecting the right leaf, ensuring proper care, and maintaining a conducive environment, you can watch your Kalanchoe thrive and flourish. With a bit of patience and attention, anyone can become a proficient propagator of this beloved succulent. Happy gardening!