The ZZ plant (Zamioculcas zamiifolia) is a favorite among indoor gardeners for its striking, glossy leaves and hardy nature. While this plant is incredibly forgiving, many green thumbs are curious about propagation methods, particularly water propagation. In this article, we’ll explore the simplest way to propagate the ZZ plant in water, perfect for beginners.
The Allure of the ZZ Plant
Before we dive into the propagation techniques, it’s worth noting why the ZZ plant is a top choice for many. Originating from East Africa, it’s known for its ability to thrive on neglect, making it suitable for those who might not have the greenest of thumbs. Its lush, dark green leaves add a touch of elegance to any space, and it also purifies the air.
Latest Posts
- Easy Steps to Successfully Grow Bhindi in Grow Bags at Home
- Easy Steps to Grow a Healthy Guava Bonsai at Home for Beginners
- How to Successfully Grow and Cultivate White Strawberry Plants at Home for Delicious and Unique Fruits
- Ultimate Guide to Successfully Growing Weeping Fig Outdoors with Proven Techniques and Expert Tips
- How to Successfully Grow Flemish Beauty Pear Trees in Canada for Optimal Harvest
- Easy Hack to Grow Strawberries Year Round in Your Home Garden for Delicious Harvests
- Growing Flemish Beauty Pears in Canada A Complete Guide for Local Gardens
- The Ultimate Guide to Growing Hibiscus Plants Year Round for Vibrant Blooms and Healthy Foliage
- Easy Ways to Boost the Growth Rate of Your Indoor Peace Lily for Lush Green Foliage
- How to Successfully Grow Oak Leaf Lettuce in Your Home Garden for Fresh and Flavorful Salads
What is Water Propagation?
Water propagation is a method where you root cuttings of a plant in water instead of soil. This technique allows you to observe the root development, making it an appealing option for beginners. In the case of the ZZ plant, water propagation can yield new plants with minimal fuss.
Why Propagate the ZZ Plant in Water?
- Visual Stimulation: Watching roots develop in clear water offers a unique sense of achievement.
- Simplification: This method reduces the mess associated with soil propagation.
- Speed: While growth can take time, observing roots developing can be quicker than planting in soil.
Now, let’s get into the nitty-gritty of propagating your ZZ plant in water.

Step-by-Step Guide to Propagate ZZ Plant in Water
Step 1: Gather Your Tools
Before you start propagating, gather the following materials:
- A healthy ZZ plant
- Sharp, clean scissors or pruning shears
- Clear glass or jar (so you can monitor growth)
- Water (preferably filtered or distilled)
- Optional: rooting hormone (though not necessary)
Step 2: Select a Healthy Stem
Look for a healthy stem with at least two leaf nodes. These nodes are vital as they contain the plant cells responsible for forming roots. Avoid selecting stems with yellowing or brown leaves, as these may indicate a problem with the plant.
Step 3: Make the Cut
Using your sharp scissors or shears, make a clean cut just below a node. It’s essential to cut at a 45-degree angle to maximize the surface area for root development. The ideal cutting length is around 4-6 inches, allowing enough space for new roots.

Step 4: Remove Lower Leaves
Remove any leaves that will be submerged in water. This step is crucial as submerged leaves can rot, introducing harmful bacteria into your water and jeopardizing your propagation efforts.
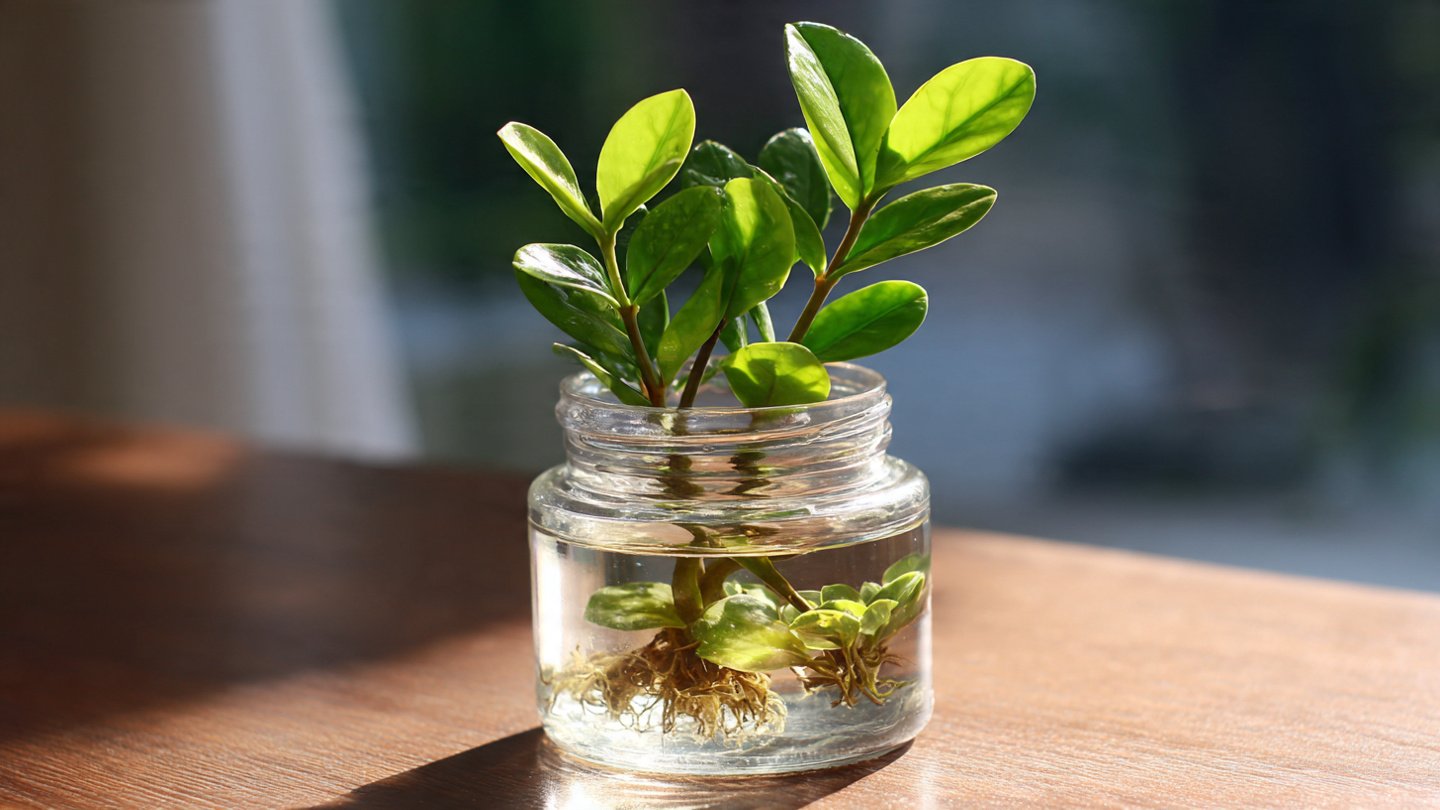
Step 5: Place in Water
Submerge the cutting in the water, ensuring that at least one node is under the water while the remaining leaves are above. This ensures that the cutting has access to both water for root growth and air for maintaining the leaves.
Step 6: Choose the Right Environment
Place your jar in a location with indirect sunlight. Too much direct sunlight can heat the water and encourage algae growth, which isn’t ideal for tiny developing roots. A warm, bright spot with filtered light will encourage healthy growth.
Step 7: Change the Water Regularly
Change the water every week or when it becomes cloudy. Fresh water helps prevent rot and ensures the cutting receives plenty of oxygen. You can also consider using filtered water to reduce chemicals that may inhibit growth.
Step 8: Wait for Roots to Develop
Patience is key! It may take anywhere from 2 to 8 weeks for roots to develop, depending on the conditions. You should start to see roots forming from the node submerged in water. Once you have at least a few inches of roots, your cutting is ready for the next step.
Step 9: Transition to Soil (Optional)

While this guide focuses on water propagation, if you prefer to transfer your rooted cutting to soil, you can do so after you’ve developed a strong root system. Choose a well-draining potting mix, and ensure the pot has drainage holes.
- Gently remove the cutting from the water, being cautious not to damage the roots.
- Plant it in a small pot filled with well-draining soil, and water lightly to settle the soil around the roots.
- Continue caring for your new ZZ plant as you would an established one.
Step 10: Care for Your New ZZ Plant
Once your new ZZ plant is in soil, treat it with the same love and care as your original plant. Water when the soil is dry a few inches down and place it in a location with indirect light.
Troubleshooting Common Issues
As with any gardening endeavor, you may face some challenges. Here are common issues and how to address them:
-
Rotting Cutting: If the cutting develops black spots or mushiness, it may be rotting. Ensure that you’re changing the water regularly and that no leaves are submerged.
-
No Root Development: If weeks pass with no visible roots, check the water quality, sunlight exposure, and ensure you cut just below a node.

-
Algae Growth: If you notice algae forming, it’s a sign of too much light or stagnant water. Change the water more frequently and move the cutting to a less bright spot.
FAQs
1. Can I propagate ZZ plants in soil instead of water?
Yes, ZZ plants can be propagated directly in soil, but water propagation is easier for beginners as it allows you to monitor root development.
2. How long does it take for ZZ plant cuttings to root?
Rooting can take anywhere from 2 to 8 weeks, depending on environmental conditions. Patience is crucial!
3. Why are my ZZ plant cuttings turning yellow?
Yellowing can indicate overwatering, poor light conditions, or that the cutting is beginning to rot. Ensure you’re following proper care guidelines.
4. Can I use tap water for propagation?
While tap water can be used, it’s best to use filtered or distilled water to prevent chemicals such as chlorine from harming the cutting.

5. How often should I change the water?
Change the water every week or as soon as it looks cloudy to ensure the cutting stays healthy.
6. What should I do if the cutting doesn’t root?
If your cutting doesn’t root, double-check that you made the cut below a node and ensure that it has enough light and fresh water.
7. How many cuttings can I propagate from one ZZ plant?
You can take multiple cuttings from one ZZ plant, but ensure that you leave enough foliage on the original plant for it to remain healthy.
Conclusion
Propagating a ZZ plant in water is an easy and rewarding way to expand your indoor garden. With just a few simple steps, patience, and care, you can grow new plants that thrive in various conditions. Whether you’re looking to expand your collection or gift a friend, water propagation is an excellent way to begin your journey into the world of plant propagation. Happy gardening!